

Gimlets Please (Hold the Turkey)
/Gimlets Please (Hold the Turkey)
Heading out to do a little emergency trim repair, my neighbor was helping me carry some tools. I said, “Grab those gimlets over there, too.”
“Gimlets? I don’t understand… you want turkey guts?”
“Where I come from we say ‘giblets’ with a ‘j’ my friend… I said gimlets,” with some emphasis on the first syllable.
“Ah, gin and lemon juice… sounds good, but can we still fix my trim?”
“No, no, gimlet, from the French word ‘guimbelet,’ meaning to bore or twist.”
My neighbor was unamused. He, like most of us, gets pretty interested when I show him big burly noisy power equipment and nods appreciatively at finely crafted heirloom hand tools, and even feigns interest when he sees me doing something as mundane as sharpening. But my little set of gimlets did not excite him at all. They should have, because in the Down To Earth Woodworking Shop these are must-have constantly used tools.

A set of seven of these indispensable little augers costs about 15 bucks, but are the go-to tools for making a quick pilot hole or through-hole for a screw, a hole for a nail (to prevent splitting), or a starter hole for a larger power-driven drill bit. In a pinch I’ve even used the sharp point of a gimlet as a scratch awl. Gimlets will get into places that drills sometimes cannot, they are precise, they look pretty cool, and they feel great in your hand.

Figure 1- The sharp point on a gimlet makes placement for precise hole-starting a breeze
And what a timesaver! With one or two pilot holes to make, finding the right size drill bit, chucking it up, and drilling the holes can take several minutes. Grab a gimlet, place the sharp point precisely on the mark, and with a couple of quick turns, a perfect pilot hole is made. There is no need to worry about over-drilling or using depth stops, either. With a gimlet, work can be very precise.
Installing nine sets of drawer slides in the new shop desk / work bench / glue-up table / clutter catcher (click here to see the video series), I used a gimlet to quickly and precisely make pilot holes dead center in the elongated holes in the slides. I could not have been as precise with a drill bit or by marking with a pencil and drilling. Nor could I have used a self-centering bit in the elongated holes. If a power drill had gotten away from me I could have easily drilled right through the side of the cabinet.
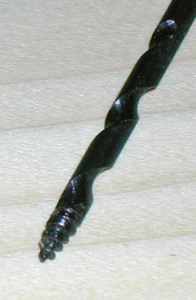
Gimlets are formed with a sharp screw thread on the first quarter- to half-inch. That screw thread then changes to a familiar auger-cutting pattern. That configuration is why you will sometimes hear these tools called “auger gimlets” or “gimlet augers.” The screw tip pulls the point into the work effortlessly, and if you continue to turn, the augur grooves enter the hole and with each turn cut and pull the debris from the hole.

Figure 3- The auger-style threads pull and eject wood chips as the gimlet makes a hole
Well made gimlets, like these, seem to self-straighten as they enter the work piece, so straight holes are a cinch. I often use the largest gimlet in the set to make clearance holes for the familiar #8 cabinet pull screws that accompany most knobs, handles, and pulls. Straight holes make attaching the hardware much simpler.
Gimlets are sized (nominally) in metric measurements, and for a while I had a difficult time matching gimlet to screw, especially for pilot holes. You can do what I did for a long time, and simply hold the screw up to each size gimlet in turn until you find the gimlet that best matches the screw you want to use. To simplify, though, we have created a chart you can use.
Try them, and in time, the gimlet will become one of your most-used tools, too.

Click on the image above to be taken to the “Resources” page where you can download this chart